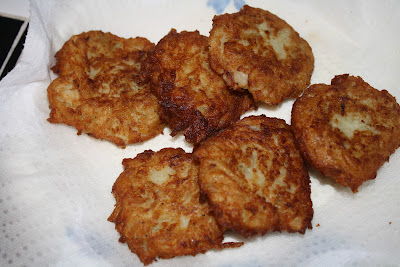
Happy Shabbatikkah!

 (aka Shabbat & Chanukah) which means Challah & Latke's on the same night! 

It is my opinion that  Challah and Latke's can take on any cupcake, cookie, or cake any day any time! 
I found this latke recipe two years ago at www.nycnosh.com and thankfully copied it down because I can't seem to access the site anymore. Either way, its your lucky day because now you can make these amazing little Chanukah traditions.

Ingredients:
2 3/4 lbs. white potatoes (about 4 medium potatoes)
1 large white onion
2 eggs, well beaten
1.5 Tablespoons matzoh meal (or flour)
1/2 teaspoon salt
1/4 teaspoon black pepper

Directions:


1. Peel all your potatoes
2. Cut half of the potatoes into one-inch chunks.
3.Boil in salted water until tender (about 20 minutes). 
4. Drain and pass through a food mill (or process smooth in a food processor). 
5. Sprinkle matzoh meal on top of this. 
6.In a large bowl, shred one large onion. Then shred both peeled potatoes into the onion, mixing together the potato shreds with the onion to keep the potato threads from discoloring. 
7. MOST IMPORTANT STEP: Squeeze as much liquid as possible from onion-potato mixture by placing the shredded vegetables into a piece of cheesecloth or kitchen towel and twisting until no more liquid can be extracted. 
8.Return to large, dry bowl and add egg, pepper, and salt. 
9. Add the puréed/milled potatoes to the shredded potatoes and combine thoroughly. 
10. Form into palm-sized patties that are about 1/2 to 3/4 inches high. Fry these patties in 1/4 to 1/2 inches of corn oil (do NOT use olive oil) . 
The patties will need to cook for about 5 minutes on the first side, so if they do more than go slightly brown after a minute or two, your oil is too hot. Flip after five minutes with a spatula and fork and cook on the other side for about 2 minutes, or until dark golden brown. Drain thoroughly on paper towels. Serve with applesauce, salt, and sour cream. Makes approximately 10-12 latkes.


 I would NOT recommend making latke's in advance, they just don't taste as good. So make it a tradition with your family and friends to make the latke's before dinner and serve HOT! 

EZ PEZEE's

{Brownies & Cookies}

A new friend from grad school told me about the MOST AMAZING brownies her mother-in-law makes. I told her if she got the recipe I would bake them...it turns out these brownies are the easiest brownies you'll ever make and with one simple addition you can serve what people will think are Gourmet Brownies or Symphony Brownies as I call them:-) Thx to Summer's MIL.

Symphony Brownies
Recipe Courtesy of Summer’s MIL, Trace


Ingredients
            1 (18.25 ounce) package Pillsbury brownie mix (follow directions on box)
            2 Symphony Bars


Directions
1.    Prepare Pillsbury Chocolate Fudge brownie mix
 (as directed on box) 
2.   2-3 Symphony bars with toffee 
(depending on what size you use. I used Theater Sized) 

For thicker brownies:
Fill a 8X8 baking pan half way with prepared brownie batter. Then, lay Symphony Bars vertically along pan. Finally, cover bars with remaining batter. 

Bake according to directions. Cool completely! Then, cut and enjoy.  

For thinner brownies:
Fill a 13X9 pan a little less than half with batter. Then, add Symphony bars to middle. Finally, cover bars with remaining batter. Do not worry if the mix does not completely cover bars. The batter will rise and cover them. Also, you will get a cool grid made from the bars that will show on the surface of the brownies. Makes the brownies look artsy and easier to cut! This is what I inadvertently did. Bake according to directions (baking time should be less). Cool completely! Then, cut and enjoy.

EASY LEMON COOKIES
Ingredients
            1 (18.25 ounce) package lemon cake mix
            2 eggs
            1/3 cup vegetable oil
            1 teaspoon lemon extract
            1/3 cup confectioners' sugar for decoration

Directions
1.    Preheat oven to 375 degrees F (190 degrees C).
2.   Pour cake mix into a large bowl. Stir in eggs, oil, and lemon extract until well blended. 
3. Drop teaspoonfuls of dough into a bowl of confectioners' sugar. Roll them around until they're lightly covered. Once sugared, put them on an ungreased cookie sheet.
Bake for 6 to 9 minutes in the preheated oven. The bottoms will be light brown, and the insides chewy.


    Grandma's Sweet Potato Pie

    Bea's Sweet Potato Pie
    Happy Thanksgiving!

    For my family, this Thanksgiving was different than any other year. This was our first Thanksgiving without Mom. The "Firsts" in life are either wonderful or difficult. When you lose a loved one the "firsts" are the most difficult.  I woke up feeling blue and didn't know how the day would unfold but I was going to be open to the blessings of this marvelous day of giving thanks and gratitude! Thanksgiving turned out to be a wonderful day filled with the aroma's of the holiday, Kilkenny's turkey dinner, conference call with my sister Cymone and time with Dad, Allie and Los. I missed my Love this year but he'll be home soon-I have a pie waiting for you :-)


    Growing up my Grandmother would make the most AMAZING sweet potato pies. A couple of years ago I learned the recipe and only make the pies once a year. For a woman who NEVER measured anything (my grandmother)  I somehow was able to get the measurements that allow me to recreate this delicious delicacy year after year.

    You can use premade Pillsbury pie crust or make your own. 

    Bea's Sweet Potato Pie
    Two thumbs up from Los!

    Sweet Potato Pie
    Makes enough for 2 pies

    3 Med/Large Yams
    6 Tablespoons butter, room temp
    4 Tablespoons of flour
    1 C. White sugar
    1/2 Teaspoon salt
    4 Large Eggs
    2 1/2 teaspoons nutmeg
    2 1/2 teaspoons Cinnamon
    1 Tablespoon Vanilla
    1 C. Whole Milk

    Preheat oven to 350.

    1. Boil potatoes (45min-1hour) until you can put a fork all the way through and peel the potatoes warm (potatoes are HOT. Be careful peeling them) Discard the skin and place the skinless potatoes in a large mixing bowl. If you are using an standing mixer put your cooked and peeled potato's directly into the bowl of the mixer.

    2.Cut the butter in small cubes and add to warm potatoes. The heat from the potatoes should be enough to melt the butter. using a fork mash the  butter into potatoes. When butter and potatoes are almost combined add flour and continue to mix together with a fork.

    3. Add the eggs mixing well to incorporate into mixture. Add sugar, nutmeg, cinnamon and lightly mix together. Then add the milk and vanilla and using an electric hand held mixer mix ingredients until smooth and creamy.

    4. Prepare your pie plates with crust and evenly pour the filling your two pie plates.
    OPTIONAL: sprinkle the bottom of your pie plate with a thin layer of brown sugar before adding your filling

    5. Cook pies for 60 minutes and rotate in oven and cook for another 45 minutes to 1 hour. Continue to cook until crust and Pie filling has browned.

    OPTIONAL: When pies are hot out of the oven lightly rub butter on top for a crispy crust

    I Scream, You Scream...

    We all scream for Ice Cream, Sorta. 
    After making Hungry Girl Vanilla Cupcakes my Friend shared a secret recipe with me that is in line with the Hungry Girl Philosophy. These little 'Sorta like' Ice Cream sandwich's are worth screaming about and they are so easy to make. 

    Ingredients:

    2 Trader Joe's Old Fashioned Cinnamon Graham Crackers
    2 Tbs Cool Whip (you can use Free Cook Whip if you prefer)
    1 Tsp multi-colored sprinkles
    Parchment Paper

    Directions: 
    1. Scoop two tablespoons of cool whip onto one graham cracker
    2. Place other graham cracker on top of cool whip and gently press down
    3. Hold sandwich over a deep bowl to prevent sprinkles from scattering and sprinkle all four sides of the sandwich.
    4. Place on parchment paper in the freezer for at least 2 hours or until cool whip is frozen.

    Only 125 Calories per sandwich.

    Enjoy!!

    Hungry Girl Vanilla Cupcakes!

    For those of you that don't know who or what Hungry Girl is, check out her page HERE. I was invited to a HG Potluck which means everyone brings a HG recipe. I love to bake so of course I chose something sweet. I found this recipe in the section Chew on the Right Thing.

    I wasn't so sure about the recipe at first but thought why not...after a couple of hours these cupcakes were Darn Good!!!!

    Unfortunately I ended up getting sick and wasn't even able to bring my cupcakes to the potluck. Thankfuly a friend came over to help me and she was able to take the little cakes to work today.

     I did however make a couple of changes to this recipe because I don't use "sugar-free" ingredients.


    For Frosting (Double Recipe)
    1 1/4 cups Cool Whip Free, thawed 
    1 1/2 tbsp. Jell-O Vanilla Instant Pudding Mix

    For Cupcakes
    1 1/2 cups Trader Joes yellow cake mix
    3/4 tsp. baking powder
    1 cup 7-UP, room temperature
    1/2 tsp. vanilla extract
    1/2 cup liquid egg whites or (about 4) raw egg whites


    Directions:
    Preheat oven to 350 degrees.

    To make the frosting, combine Cool Whip with pudding mix in a bowl, and mix until smooth. I used my Kitchen-Aid and let it mix for about 3 minutes. I then transferred the frosting to a pastry bag and stored in the refrigerate until cupcakes were ready to be frosted.

    In a large bowl, combine cake mix with baking powder and stir until free of lumps. Add soda and vanilla extract, and stir or whisk until batter is smooth. Set aside.

    In a separate bowl, whip egg whites (at room temperature) with a handheld electric mixer set to medium speed until fluffy. Read Baking 911 egg white tutorial.


    Gently fold egg whites into the cake batter until thoroughly combined.

    Line 9 cups of a 12-cup muffin pan with baking cups or spray with nonstick spray. Evenly distribute batter among the 9 cups. Cups will be VERY full -- this is okay! My batter made 14 Cupcakes

    Bake for 15 - 17 minutes, until a toothpick inserted into the center of a cupcake comes out fairly clean. Set aside and allow to cool completely.

    Once cupcakes have cooled, top each evenly with the frosting and 1 tsp. sprinkles. Let cupcakes stand for an hour and then Enjoy!!


    Peanut Brittle...worth trying!!!


    I made peanut brittle several years ago to give away as gifts and it was a real winner.

    During the last couple of week I kept dreaming of peanut brittle so Thursday night I thought I would give it a try. TRY is the operative word. I TRIED twice and twice I failed.

    I always read food network reviews and wonder about those people that say "I followed the recipe exactly and it didn't look anything like the picture and tasted awful too" well I can officially put myself in that category. I tried twice and failed twice!!!

    I like to think of myself as "the little engine that could" so I tried again last night after reading lots of cookbooks and watching several YouTube videos on making brittle. Long story very short...it takes time for brittle to cook, you cant rush the process AND you MUST have a thermometer.

    My revised version of the recipe!

    Ingredients

        * 1 cup white sugar
        * 1/2 cup light corn syrup
        * 1/4 teaspoon salt
        * 1/4 cup water
        * 1 cup peanuts
        * 2 tablespoons butter, softened
        * 1 teaspoon of vanilla extract
        * 1 teaspoon baking soda

    Directions
    1. Grease a large cookie sheet. Set aside.
    2. In a heavy 2 quart saucepan, over medium heat, bring to a boil sugar, corn syrup, salt, and water. Stir until sugar is dissolved.
    3. Insert your thermometer into the pot. Dont let the tip of the thermometer touch the bottom of the pan.
    4. When the tempature reads 250 Degrees F. Stir in peanuts. Continue cooking. Stir frequently until temperature reaches 305 degrees F (150 degrees C), or until a small amount of mixture dropped into very cold water separates into hard and brittle threads.
    5. Remove from heat; immediately stir in butter or margarine, Vanilla extract and baking soda; pour at once onto cookie sheet. With 2 forks, lift and pull peanut mixture into rectangle about 14x12 inches; let cool for 30-40 minutes and then Snap candy into pieces.

    Recipe adapted from allrecipes.com Moms Best Peanut Brittle

    Cake Pops...Gotta Love'em!!

    I went on a cake pop marathon in the past few weeks. At first these little pops seemed difficult and time consuming but once you get the hang of it there actually quite easy and a joy to make.


     These were the leftovers, just  decided to play and have fund with them


     My best friend and I made these for her children's school. It was Harvest day! These little pops came in first place for taste and look.


    Homemade Oreo's-Take II


    So the story goes like this...
    1. I went to a potluck shabbat and 
    2. Someone brought homemade oreo cookies. 
    3. They were beautiful and everyone loved them. 
    4. They were the perfect potluck dessert
    5.  I wanted to make them. 

    Since I couldn't get the recipe from the baker, I had to do some recon work via the web. I found a few but could't pick just one until I woke up this morning at 4AM and decided to try Smitten Kitten's recipe. I must have still been a little tired because I not only burned the first batch but I added 3/4cup TOO much butter.  When I took the cookies out of the oven, needless to say, I was not a happy camper...I waited a few hours and tired again. And the finished product... 


    Gingerbread and the Bullseye...


    I got the cutest little gingerbread man cookie cutter at Michaels for .99 cents...and I just can't stop making these little men...I made these for one of my best friends who has been with the bullseye company, aka Target, since we graduated!!!


    Challah...

    6-Strand Braided Challah
    Challah Dough Ball
    I recently taught a challah baking class at The Wellness Community in West Los Angeles. The Wellness Community (TWC) is a not for profit organization that offers free services to those with cancer and their loved ones. Monday-Saturday there are yoga classes, tai chi classes, workshops, support groups

    Poppy Seeds to compliment
    all free of charge. A couple of weeks ago I had the privilege of teaching a class and what a rewarding was to spend a Friday afternoon. There were 13 wonderful women and one awesome dude in my class. we had a great time and the challah's turned out delicious. I didn't get any pictures of the class but I baked challah last night so here is the 1, 2, 3 of challah baking!
    Shabbat Shalom

    December Wedding

    One of my nearest and dearest friends from high school called me over a year ago to tell me that he was getting married to the love of his life. Have you ever met a couple who was absolutley perfect for one another? Well Bill & Julie are that couple. Their wedding was December 27 2009 and I had the honor to making their wedding cake.

    Three tiers: bottom two were wedding white cake with vanilla buttercream icing and handmade marshmallow fondant. The top tier was lemon cake with Raspberry buttercream covered in the same handmade marshmallow fondant.

    I also made matching sugar cookies in the shape of a three tiered wedding cake.

    Lemon Lemon and More Lemon


    Its Big Ted's birthday this coming Thursday and I wanted to make him a cake that I knew he couldn't resist.  Like my dad, he loves all things sweet and lemon flavored.  As I continue to grow in the kitchen, I am finding there are some chefs who are spot on EVERY TIME and Ina Garten is one of them (also known as the Barefoot Contessa).


    This Lemon Cake is the key that will unlock the lemon lovers soul. It is truly something to write about. Moist, sweet and tart, and melts in your mouth. Let me not forget that it is also easy to bake.

    Ingredients

    • 1/2 pound (2 sticks) unsalted butter, at room temperature
    • 2 1/2 cups granulated sugar, divided
    • 4 extra-large eggs, at room temperature (4 eggs will do if its all you have)
    • 1/3 cup grated lemon zest (4 to 6 large lemons) 
    • 3 cups flour
    • 1/2 teaspoon baking powder
    • 1/2 teaspoon baking soda
    • 1 teaspoon kosher salt
    • 3/4 cup freshly squeezed lemon juice, divided
    • 3/4 cup buttermilk, at room temperature
    • 1 teaspoon pure vanilla extract

    For the glaze:

    • 2 cups confectioners' sugar, sifted
    • 3 1/2 tablespoons freshly squeezed lemon juice

    Directions

    Preheat the oven to 350 degrees F. Grease and flour 2 (8 1/2 by 4 1/4 by 2 1/2-inch) loaf pans. You may also line the bottom with parchment paper, if desired.
    Cream the butter and 2 cups granulated sugar in the bowl of an electric mixer fitted with the paddle attachment, until light and fluffy, about 5 minutes. With the mixer on medium speed, add the eggs, 1 at a time, and the lemon zest.
    Sift together the flour, baking powder, baking soda, and salt in a bowl. In another bowl, combine 1/4 cup lemon juice, the buttermilk, and vanilla. Add the flour and buttermilk mixtures alternately to the batter, beginning and ending with the flour. Divide the batter evenly between the pans, smooth the tops, and bake for 45 minutes to 1 hour, until a cake tester comes out clean.
    When the cakes are done, allow to cool for 10 minutes. Remove the cakes from the pans and set them on a rack set over a tray or sheet pan. Allow the cakes to cool completely.  Dip cakes in syrup (Optional**).
    **If you decide to use syrup I recommend pouring the syrup into a flat pan that your loaf easily can be placed in and removed. After letting your cake cool down enough that you can pick them up with your bare hands, dip the top and bottom in the syrup.
    Syrup (Optional)

    Combine 1/2 cup granulated sugar with 1/2 cup lemon juice in a small saucepan and cook over low heat until the sugar dissolves. (I used 1/4 cup lemon juice and 1/4 cup water and didn't use all of the syrup)
    Icing
    Combine the confectioners' sugar and the lemon juice in a bowl, mixing with a wire whisk until smooth. Pour over the tops of the cakes and allow the glaze to drizzle down the sides.

    Childhood Favorite: Mackerel Patties & Rice


    So its been a very very very very long time since I have posted.  Did I already mention that its been a VERY long time since I have blogged. Well it has and I have missed it. I just finished my first term of graduate school and moved my parents to Los Angeles so I can help care for my mother. LOTS going on to say the leaset BUT...today I am sitting  on the lanai over-looking the pacific ocean on the island of Maui. It’s been a while since I have blogged but an even longer while since I have taken a vacation. I am taking each day and allowing myself to be at peace with what is-MY LIFE!  Since finishing school and getting settled in Maui I am finding my desire to bake is taking over. Last night I made a batch of strawberry shortcake cookies and a strawberry loaf bread....”mmmm mmmm good” said those at dinner.

    Today I am making one of my childhood favorites-Mackerel Patties and Rice! 

    Growing up my dad would make these little patties and serve them with rice. Dad would give each of my sisters and I a bowl of rice and then have a plate of patties that we could take from as we wished. Not to long ago I asked my dad for the recipe not knowing just how easy these little treats are to make. 

    Ingredients:
    1 can of mackerel
    2 eggs
    salt to taste (I use Lawry’s seasoning salt and some garlic salt)
    pepper to taste
    1-2 Tbl flour

    1. Open can of mackerel and let it slide out onto a plate. Gently split the fish down the middle and remove bone. If done carefully the whole bone can be removed in one move. If not, it doesn’t take long to debone and I have read that some people don’t even debone mackerel because the bones are so soft you don’t even notice them once the patties are prepared.

    2. In a separate bowl lightly mix the eggs just until the yolk has dissolved into the white of the egg. 

    3. Heat frying pan on high with a little bit of vegetable oil.  When ready to insert your patties turn the temperature to medium.

    4.Add the deboned mackeral to the egg mix and with a fork mash it really well.

    5. Add salt and pepper to taste 

    6. Once egg and mackerel are mixed well add 1 Tbl flour. Continue to mix until you can form a patty in your hand. If fish mixture is too runny just add more flour. 

    7. Make all the patties and place them on a plate before you start to fry them. Cook them several minutes on each side.

    8. Put a paper towel on a plate as lay patties on paper towel as they finish.

    9. Make a side of rice  and vahlaa...Dad's mackerel and rice!

    Tajrish Restaurant, Marina Del Rey, CA


    I have had a lot of free time on my hands. I guess having the flu and being confined to my bed for four days will do that to a person. Haven't had a huge appetite until this afternoon when I started craving Persian food. I recently had lunch at my new favorite hidden find, The Ruby Room. Since that lunch I have been craving Persian food. So I am still confined to my bed but really, really hungry and determined to get Persian food. My google search returned ONE Persian restaurant, Tajrish, that met my simple criteria; first being they will deliver to my area and second, reasonable price point. Its a restaurant that I drive by often and have always wondered about their food so this was both my opportunity to give them a try and their opportunity to earn a regular customer. I ordered my favorite Persian combo plate beef koobideh kabab and chicken koobideh kabob with traditional saffron rice. Hold on, that's my food at the door. Time to eat...

    Visually the food was picture perfect. Very generous portions, one entree would have been enough for two. Meal came with two pieces of lavash bread and butter. I ate about 1/4 of the meal. The taste wasn't what I was hoping for, it wasn't bad it just wasn't great. The rice was too dry and the meat was so so....not as fresh as I like it. The price was $12.99 plus tax and delivery was free. I will definitely give them one more shot...this meal wasn't my favorite but has potential! Maybe dinner one night next week:-)

    Pros: Reasonably priced, generous portions, visually very appetizing
    Cons: Rice was too dry, meat was so so

    Comment: will give it one more shot!

    When life gives you lemons...


    Or a Ginger & Lemon Hot Toddy


    ginger,ginger root lemons,yellow,sliced lemon
    Like most people this season I caught the flu and for the last four days-yes 1, 2, 3, 4 DAYS I have been in bed with the fever, sore throat, can't swallow flu. It has not been fun but like the sign says...when life gives you lemons, make lemonade or like I did make a Ginger & Lemon hot toddy. On Sunday morning when I realized that I had been caught by this flu I did an online search for homeopathic remedies for a sore throat and came across this a form called myhomeremedies. On this form was a recipe for hot water with ginger and so I sent Teddy to the store to pick up some fresh ginger root and lemons so I could get to work. It doesn't take the flu away but this Ginger & Lemon Hot Toddy makes the sore throat a little more bearable.

    This has worked great for me and I just had to share it. One of the nicest things about this recipe is its easy to make and one batch can last a long time. Since ginger acts as an anti-imflamitory it helps with the swelling of the glands thus reducing the typical sore throat pain.

    Ingredients:
    3 Large ginger roots (purchased at local Grocery Store)
    5-6 Lemons
    Large pot of water
    Honey (optional)

    1. Use a peeler to peel the outside skin of the ginger. I don't know if you really have to do this but I feel like you get more from the root by doing it. It doesnt have to be completely free of skin but get as much as you can.
    2. Slice and dice ginger into 1/4 inch-1/2 inch pieces
    3. Place ginger in large pot and fill with water
    4. Boil water and ginger on med for 10-15 minutes. The longer the ginger sits in the water the stronger the hot toddy.
    5. Use a strainer or plate or whatever you have to fill your cup with some of the liquid.
    6. Let the remaining liquid sit on the stove for 30 minutes and then transfer remaining ginger water to a container for later use.
    7. Slice a lemon in half. Squeeze half a lemon in your hot toddy and sip while warm.

    Your first hot toddy will be the weakest which is good because it will give you a chance to get used to the taste but as the ginger sits in the water it will make your next several hot toddy's VERY strong. For the last few cups I had to put a little honey to cut the tang of the ginger. Totally optional. You should feel some relief after the first cup is finished. Drink it throughout the day and right before bed. Always drink it warm.

    LinkWithin

    Related Posts with Thumbnails